Создание вашего собственного проиложения на языке C
Было сделано много усилий, чтобы эти руководства были простыми для компиляции и запуска, насколько это возможно. К сожалению, это означает, что CMakes скрывает, как это сделать в вашем собственном проекте.
Итак, это руководство объяснит, как создать на языке C собственное приложение с нуля. Но сначала вам нужно знать, что делает компилятор.
Пожалуйста, не пропускайте первые два раздела. Если вы читаете это руководство, то вам, вероятно, нужно знать этот материал.
Модель приложений на языке C
Предварительная обработка
Здесь объясняется обо всех этих #defines и #includes.
Предварительная обработка - это очень простая задача: копипаст (вырезать-и-вставить).
Когда препроцессор видит следующий MyCode.c :
#include "MyHeader.h"

void main(){
    FunctionDefinedInHeader();
}
, он просто открывает файл MyHeader.h, и копирует его содержимое в MyCode.c :
// Начало MyCode.c
// Начало MyHeader.h
#ifndef MYHEADER_H
#define MYHEADER_H

void FunctionDefinedInHeader(); // Declare the function

# endif
// Конец MyHeader.h

void main(){
    FunctionDefinedInHeader(); // Use it
}

// Конец MyCode.c
Аналогично, работают #defineы - производят подстановки, #ifы анализируют и удаляют неиспользуемые блоки, и т.д.
В конце этого шага у нас есть предварительно обработанный файл C++ без каких-либо #define, #if, #ifdef, #include, готовый к компиляции.
В качестве примера, вот файл main.cpp 6-го руководства, полностью предварительно обработанный в Visual : tutorial06_preprocessed. Осторожно, это огромный файл! Но знайте, что такой простой .cpp увидит компилятор.
Компиляция
Компилятор преобразует код C++ в представление понятное центральному процессору. Например, следующий код :
int i=3;
int j=4*i+2;
будет преобразован в это : опкоды (коды операций процессора) x86
mov         dword ptr [i],3
mov         eax,dword ptr [i]
lea         ecx,[eax*4+2]
mov         dword ptr [j],ecx
Каждый .cpp файл компилируется отдельно и полученный двоичный код записывается в .o/.obj файлы.
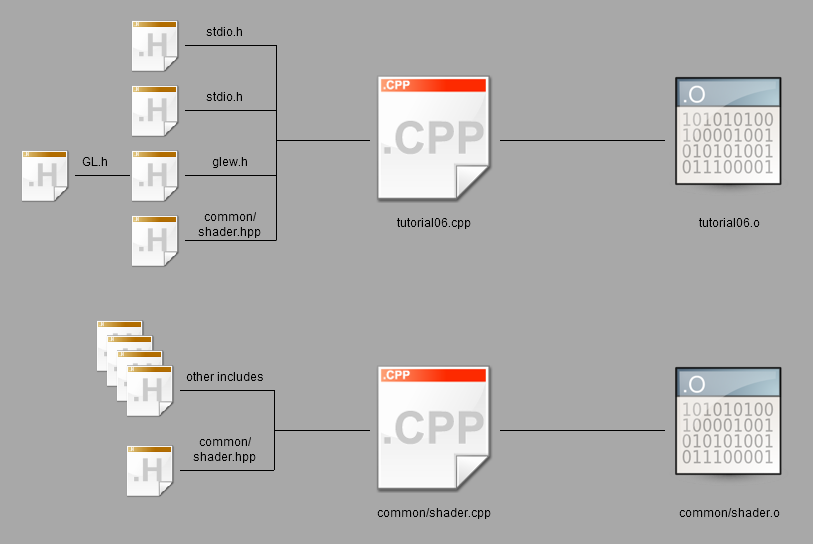
Заметьте, что у нас до сих пор нет исполняемого файла : остался последний шаг.
Связывание (компоновка, линковка)
Компоновщик берёт все двоичные коды (ваши и из внешних библиотек) и создаёт конечный исполняемый файл. Несколько замечаний :
- Библиотеки имею расширение .lib.
- Некоторый библиотеки статические. Это означает, что .lib содержит все необходимые x86 опкоды.
- Некоторый библиотеки динамические (также говорят разделяемые). Это означает, что .lib не содержит кода x68; она просто говорит: “Обещаю, что функции Foo, Bar и WhatsNot будут доступны во время выполнения”.
Когда компоновщих закончит работу ы вас будет исполняемый файл (.exe в Windows, .nothing_at_all s unix) :

Время выполнения
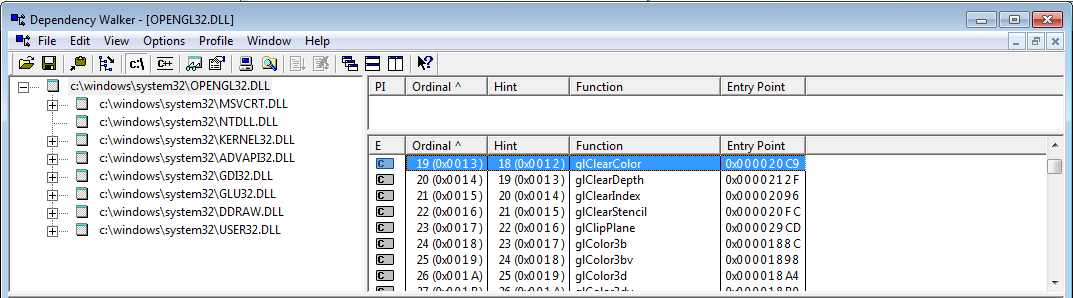
Когда вы запускаете исполняемый файл ОС открывает .exe и помещает все x68 опкоды в память. Как было сказано ранее, некоторый код недоступен в этот момент : код из динамических библиотек. Но компоновщих был достаточно хорош, чтобы сказать, где искать этот код : в .exe чётко сказано, что функция glClearColor реализована в OpenGL32.dll.

Windows с радостью откроет .dll и найдёт glClearColor :
Иногда .dll не может быть найдена, например, из-за прерывания процесса установки, и программа просто не может быть запущена.
Как мне сделать X в среде разработке (IDE) Y ?
Инструкции по созданию OpenGL приложения разделены на последовательные базовые операции. Это сделано намеренно :
- Во-первых, вам придётся это делать постоянно, так что лучше хорошенько в этом разобраться
- Во-вторых, вы будете понимать что относиться к OpenGL, а что нет.
Visual Studio
Создание нового проекта
Файл -> Новый -> Проект -> Пустой проект (ориг. File -> New -> Project -> Empty project). Не используйзуете мастер. Не используйте какие-либо опции, о оторых не знаете (отключите MFC, ATL, предварительно скомпилированные заголовки, stdafx, main файл).
Добавление файлов исходных кодов в проект
Щёлкните правой кнопкой мыши по Файлы исходного кода -> Добавить новый (ориг. Source Files -> Add new).
Добавление каталогов включаемых файлов
Щёлкните правой кнопкой мыши по проекту -> Свойства -> C++ -> Общие -> Дополнительные каталоги включаемых файлов (ориг. Project Properties -> C++ -> General -> Additional include directories). Это, по сути, выпадающий список, который вы можете легко изменить.
Связь с библиотекой
Щёлкните правой кнопкой мыши по проекту -> Свойства -> Компоновщик -> Ввод -> Дополнительные зависимости (ориг. Project Properties -> Linker -> Input -> Additional dependencies) : введеите имя .lib. Например: opengl32.lib
В Свойства -> Компоновщик -> Общие -> Дополнительные каталоги библиотек (ориг. Project Properties -> Linker -> General -> Additional library directories) убедитесь, что задан путь к указанной библиотеке.
Сборка, запуск и отладка
Задайте рабочий каталог (ту, где расположены ваши текстуры и шейдеры) : Свойства -> Отладка -> Рабочий каталог (ориг. Project Properties -> Debugging -> Working directory)
Запуск : Shift-F5; но вам, вероятно, никогда не понадобится это делать. Вместо этого - Отладка : F5
Краткий список горячих клавиш для отладки :
- F9 на строке или шелчёк слева от номера строки: установка точки остановки. Появится красная точка.
- F10 : выполнить текущую строку
- F11 : выполнить текущую строку, но заходить в функции, которые вызываются на этой строке (“шаг с заходом”)
- Shift-F11 : выполнить до конца функции (“шаг с выходом”)
У вас также есть много отладочных окон: наблюдаемые переменные, стек вызовов, потоки, …
QtCreator
QtCreator доступен бесплатно по ссылке http://qt-project.org/.
Создание нового проекта
Используйте простой C или C++ проект; избегайте шаблонов, заполненных материалом Qt.
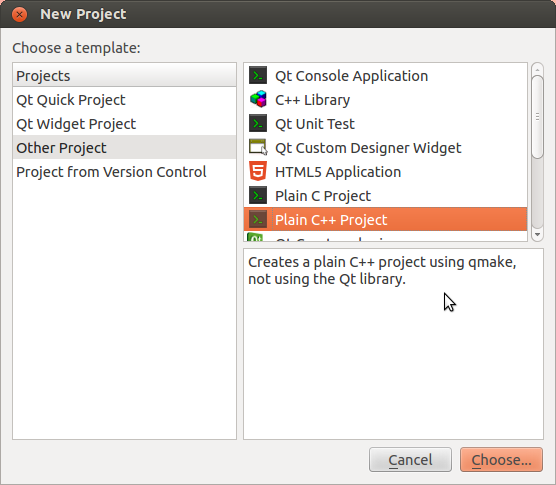
используйте параметры по-умолчанию.
Добавление файлов исходных кодов в проект
Используйте графический интерфейс или добавьте файлы в файл .pro :
SOURCES += main.cpp \
           other.cpp \
           foo.cpp
Добавление каталогов включаемых файлов
В файле .pro :
<code>INCLUDEPATH += <your path> \ <other path> </code>
Связь с библиотекой
Щёлкните правой кнопкой мыши по проекту -> Add library
- Если вы используете Linux вы установили библиотеку с помощью apt-get или подобных образом, есть вероятность, что библиотека зарегистрировалась в системе. Вам нужно выбрать “System package” и указать имя библиотеки (например : libglfw или glew )
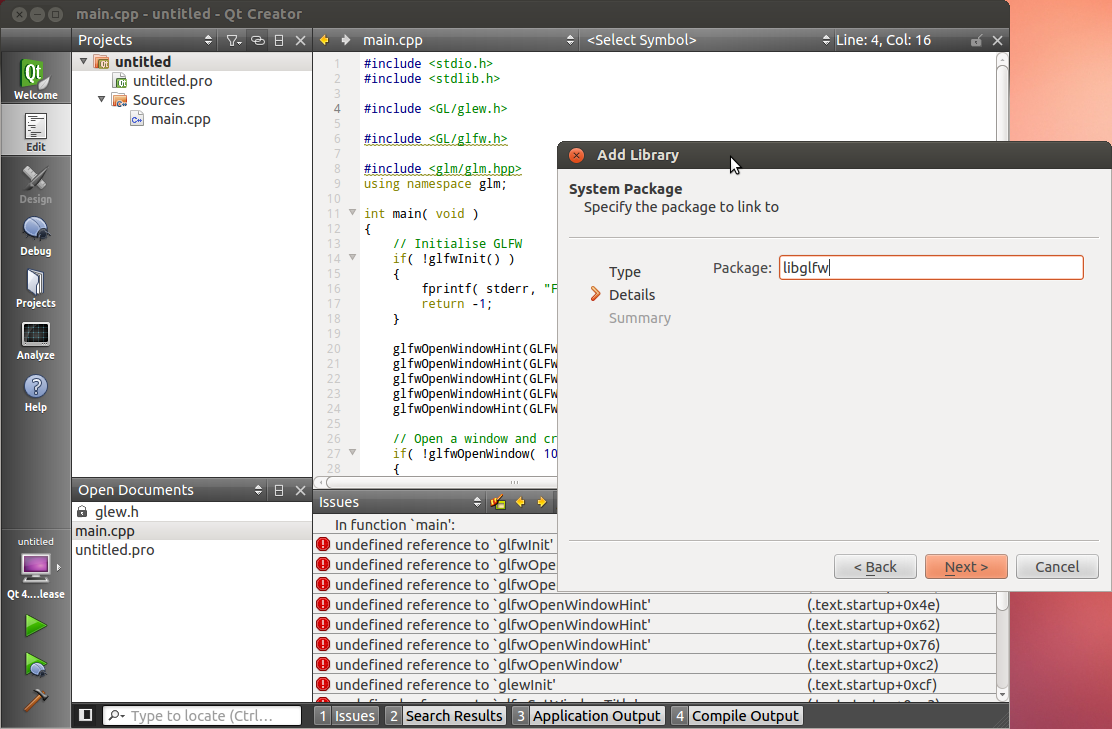
- Если нет, используйте «System Library». Указите, куда вы её скомпилировали.
Сборка, запуск и отладка
Сборка : Ctrl-B, или иконка молотка в нижнем левом углу.
Запуск : иконка с зелёной стрекой. Вы можете указать параметры командной строки приложения и рабочий каталогв Projects -> Run Settings
Отладкаg :
- Установка точки остановки : шелчёк слева от номера строки. Появится красная точка.
- F10 : выполнить текущую строку
- F11 : выполнить текущую строку, но заходить в функции, которые вызываются на этой строке (“шаг с заходом”)
- Shift-F11 : выполнить до конца функции (“шаг с выходом”)
У вас также есть много отладочных окон: наблюдаемые переменные, стек вызовов, потоки, …
XCode
В разработке…
Создание нового проекта
Добавление файлов исходных кодов в проект
Добавление каталогов включаемых файлов
Связь с библиотекой
Сборка, запуск и отладка
CMake
CMake создаёт проекты практически для любого инструмента построения программного обеспечения : Visual, QtCreator, XCode, make, Code::Blocks, Eclipseб и т.д. на любой ОС. он освобождает вас от необходимости поддерживать множество файлов проектов.
Создание нового проекта
Создайте файл CMakeLists.txt и добавьте в него следующее (доработайте при необходимости) :
cmake_minimum_required (VERSION 2.6)
project (your_project_name)

find_package(OpenGL REQUIRED)

add_executable(your_exe_name
    tutorial04_colored_cube/tutorial04.cpp
    common/shader.cpp
    common/shader.hpp
)
Запуститье CMake GUI, найдите ваш .txt файл и выберите каталог для сборки. Щёлкните Configure, затем Generate. Ваше решение будет создано в каталоге для сборки.
Добавление файлов исходных кодов в проект
Просто добавить строку в команде add_executable.
Добавление каталогов включаемых файлов
include_directories(
    external/AntTweakBar-1.15/include/
    external/glfw-2.7.2/include/
    external/glm-0.9.1/
    external/glew-1.5.8/include/
    .
)
Связь с библиотекой
set(ALL_LIBS
    ${OPENGL_LIBRARY}
    GLFW_272
    GLEW_158
    ANTTWEAKBAR_151_OGLCORE_GLFW
)

target_link_libraries(tutorial01_first_window
    ${ALL_LIBS}
)
Сборка, запуск и отладка
CMake этого не делает. используйте вашу любимую среду разработки.
make
Пожалуйста, просто не используй это.
gcc
Возможно, стоит скомпилировать небольшой проект “вручную”, чтобы лучше понять рабочий процесс. Только не делай этого на реальном проекте…
Заметьте, что Вы также можете сделать это в Windows с помощью mingw.
Скомпилируйте каждый .cpp файл отдельно :
g++ -c main.cpp
g++ -c tools.cpp
Как было сказано выше, у вас будут файлы main.o и tools.o. Свяжите их :
g++ main.o tools.o
появиться файл a.out; Это ваш исполняемый файл, запустите его :
./a.out
Вот и все !
Создание вашего собственного проиложения на языке C
Вооружившись этими знаниями, мы можем начать создавать собственное OpenGL приложение.
- Скачайте зависимости : тут мы используем GLFW, GLEW и GLM, но в зависимости от вашего проекта, вам может понадобиться что-то другое. Желательно сохранять в подкаталог вашего проекта (например: external/)
- Они должны быть предварительно скомпилированы для вашей платформы. Однако GLM не обязательно компилировать.
- Создайте новый проект в выбранной вами среде разработке
- Добавьте новый .cpp файл в проект
- Copy and paste, for instance, the following code (this is actually playground.cpp) :
- Скопируйте и вставьте, например, следующий код (это фактически playground.cpp) :
#include <stdio.h>
#include <stdlib.h>

#include <GL/glew.h>

#include <GL/glfw.h>

#include <glm/glm.hpp>
using namespace glm;

int main( void )
{
	// Инициализация GLFW
	if( !glfwInit() )
	{
		fprintf( stderr, "Failed to initialize GLFW\n" );
		return -1;
	}

	glfwOpenWindowHint(GLFW_FSAA_SAMPLES, 4);
	glfwOpenWindowHint(GLFW_WINDOW_NO_RESIZE,GL_TRUE);
	glfwOpenWindowHint(GLFW_OPENGL_VERSION_MAJOR, 3);
	glfwOpenWindowHint(GLFW_OPENGL_VERSION_MINOR, 3);
	glfwOpenWindowHint(GLFW_OPENGL_PROFILE, GLFW_OPENGL_CORE_PROFILE);

	// Открытие окна и создание его OpenGL контекста
	if( !glfwOpenWindow( 1024, 768, 0,0,0,0, 32,0, GLFW_WINDOW ) )
	{
		fprintf( stderr, "Failed to open GLFW window. If you have an Intel GPU, they are not 3.3 compatible. Try the 2.1 version of the tutorials.\n" );
		glfwTerminate();
		return -1;
	}

	// Инициализация GLEW
	if (glewInit() != GLEW_OK) {
		fprintf(stderr, "Failed to initialize GLEW\n");
		return -1;
	}

	glfwSetWindowTitle( "Playground" );

	// Убедитесь, что мы можем захватить клавишу escape при нажатии ниже
	glfwEnable( GLFW_STICKY_KEYS );

	// Тёмно синий фон
	glClearColor(0.0f, 0.0f, 0.3f, 0.0f);

	do{
		// Ничего не рисуйте, увидимся в уроке № 2 !

		// Меняем буферы
		glfwSwapBuffers();

	} // Проверяем, была ли нажата клавиша ESC или окно было закрыто
	while( glfwGetKey( GLFW_KEY_ESC ) != GLFW_PRESS &&
		   glfwGetWindowParam( GLFW_OPENED ) );

	// Закрываем окно OpenGL и завершаем GLFW
	glfwTerminate();

	return 0;
}
- Скомпилируйте проект.
У вас будет много ошибок компиляции. Мы проанализируем их все, по одной.
Troubleshooting
The error messages below are for Visual Studio 2010, but they are more or less similar on GCC.
Visual Studio - fatal error C1083: Cannot open filetype file: ‘GL/glew.h’ : No such file or directory
(or whichever other file)
Some headers are in weird locations. For instance, GLEW include files are located in external/glew-x.y.z/include/. The compiler has no way to magically guess this, so you have to tell him. In the project settings, add the appropriate path in the COMPILER (not linker) options.
Under no circumstance you should copy files in the compiler’s default directory (Program Files/Visual Studio/…). Technically, this will work, but it’s very bad practice.
Also, it’s good practice to use relative paths ( ./external/glew/… instead of C:/Users/username/Downloads/… )
As an example, this is what the tutorial’s CMake use :
external/glfw-2.7.2/include
external/glm-0.9.1
external/glew-1.5.8/include
Repeat until all files are found.
GCC - fatal error: GL/glew.h: No such file or directory
(or whichever other file)
This means that the library is not installed. If you’re lucky, the library is well-known and you just have to install it. This is the case for GLFW, GLEW and GLM :
sudo apt-get install libglfw-dev libglm-dev libglew1.6-dev
If this is not a widespread library, see the answer for Visual Studio above.
Visual Studio - error LNK2019: unresolved external symbol glfwGetWindowParam referenced in function main
(or whichever other symbol in whichever other function)
Congratulations ! You have a linker error. This is excellent news : this means that the compilation succeeded. Just one last step !
glfw functions are in an external library. You have to tell the linker about this library. Add it in the linker options. Don’t forget to add the path to the library.
As an example, this is what the Visual project use. The names are a bit unusual because this is a custom build. What’s more, GLM doesn’t need to be compiled or linked, so it’s not here.
external\Debug\GLFW_272.lib
external\Debug\GLEW_158.lib
If you download these libraries from SourceForge (GLFW, GLEW) and build a library yourself, you have to specify the correct path. For instance :
C:\Where\You\Put\The\Library\glfw.lib
C:\Where\You\Put\The\Other\Library\glew32.lib
GCC - main.cpp: undefined reference to `glfwInit’
(or whichever other symbol in whichever other file)
Same answer than for Visual Studio.
Note that on Linux, GLFW and GLEW (and many others) are usually installed with apt-get or similar : sudo apt-get install libglew-dev libglfw-dev (may vary). When you do that, the library is copied in the compiler’s standard directory, so you don’t have to specify the path. Just link to glfw and glew as shown in the 1rst section.
I set everything right, but I still have an “unresolved external symbol” error !
This might me tricky to track down. Here are several options:
I have a linker error with _imp_glewInit or some other symbol that begins with _imp
This means that the library (in this case, glew) has been compiled as a static library, but you’re trying to use it as a dynamic library. Simply add the following preprocessor directive in your compiler’s options (for your own project, not glew’s) :
GLEW_STATIC
I have some other weird problem with GLFW
Maybe GLFW was built as a dynamic library, but you’re trying to use it as a static one ?
Try adding the following preprocessor directive :
GLFW_DLL
I have another linker problem ! Help me, I’m stuck !
Please send us a detailed report and a fully featured zipped project, and we’ll add instructions.
I’d like to solve this myself. What are the generic rules ?
Let’s say you’re the author of GLFW. You want to provide the function glfwInit().
When building it as a DLL, you have to tell the compiler that glfwInit() is not like any other function in the DLL : it should be seen from others, unlike glfwPrivateImplementationMethodNobodyShouldCareAbout(). This is done by declaring the function “external” (with GCC) or “__declspec(dllexport)” (with Visual).
When you want to use glfw, you need to tell the compiler that this function is not really available : it should link to it dynamically. This is done by declaring the function “external” (with GCC) or “__declspec(dllimport)” (with Visual).
So you use a handy #define : GLFWAPI, and you use it to declare the functions :
GLFWAPI int glfwInit( void );
- When you’re building as a DLL, you #define GLFW_BUILD_DLL. GLFWAPI then gets #define’d to __declspec(dllexport)
- When you’re using GLFW as a DLL, you #define GLFW_DLL. GLFWAPI then gets #define’d to __declspec(dllimport)
- When you’re building as a static lib, GLFWAPI is #define’d to nothing
- When you’re using GLFW as a static lib, GLFWAPI is #define’d to nothing.
So the rule is : these flags must be consistent. If you build a lib (any lib, not just GLFW) as a DLL, use the right preprocessor definition : GLFW_DLL, GLEW_STATIC
My program crashes !
There are many reasons why a C++ OpenGL application might crash. Here are a few. If you don’t know the exact line where your program crashes, learn how to use a debugger ( see shortcuts above). PLEASE don’t debug with printf().
I don’t even go inside main()
This is most probably because some dll could not be found. Try opening your application with Dependency Walker (Windows) or ldd (Linux; try also this)
My program crashes on glfwOpenWindow(), or any other function that creates an OpenGL context
Several possible reasons :
- Your GPU doesn’t support the requested OpenGL version. Try to see the supported version with GPU Caps Viewer or similar. Update driver if it seems too low. Integrated Intel cards on netbooks especially suck. Use a lower version of OpenGL (2.1 for instance), and use extensions if you lack features.
- Your OS doesn’t support the requested OpenGL version : Mac OS… same answer.
- You’re trying to use GLEW with an OpenGL Core context (i.e. without all the deprecated stuff). This is a GLEW bug. Use glewExperimental=true before glewInit(), or use a compatibility profile ( i.e. use GLFW_OPENGL_COMPAT_PROFILE instead of GLFW_OPENGL_CORE_PROFILE )
My program crashes on the first OpenGL call, or on the first buffer creation
Three possible reasons :
- You’re not calling glewInit() AFTER glfwOpenWindow()
- You’re using a core OpenGL profile, and you didn’t create a VAO. Add the following code after glewInit() :
	GLuint VertexArrayID;
	glGenVertexArrays(1, &VertexArrayID);
	glBindVertexArray(VertexArrayID);
- You’re using the default build of GLEW, which has a bug. You can’t use a Core OpenGL Profile due to this bug. Either Use glewExperimental=true before glewInit(), or ask GLFW for a Compatibility Profile instead :
glfwOpenWindowHint(GLFW_OPENGL_PROFILE, GLFW_OPENGL_COMPAT_PROFILE);
My program crashes when I try to load some file
Setup your working directory correctly. See Tutorial 1.
Create a test.txt file and try the following code :
if ( fopen("test.txt", "r" ) == NULL ){
    printf("I'm probably running my program from a wrong folder");
}
USE THE DEBUGGER !!!! Seriously ! Don’t debug with printf(); use a good IDE. http://www.dotnetperls.com/debugging is for C# but is valid for C++ too. Will vary for XCode and QtCreator, but concepts remain exactly the same.
Something else is wrong
Please contact us by mail