Picking with a physics library
In this tutorial, we will see the “recommended” way to pick objects in a classical game engine - which might not be your case.
The idea is that the game engine will need a physics engine anyway, and all physics engine have functions to intersect a ray with the scene. On top of that, these functions are probably more optimized than what you’ll be able to do yourself : all engines use space partitionning structures, which make it possible to avoid testing intersection with most objects which are not in the same region.
In this tutorial, we will use the Bullet Physics Engine, but the concepts are exactly the same for any other : PhysX, Havok, etc.
Bullet integration
Lots of tutorials explain how to integrate Bullet; in particular, the Bullet’s wiki is very well done.
// Initialize Bullet. This strictly follows http://bulletphysics.org/mediawiki-1.5.8/index.php/Hello_World,
// even though we won't use most of this stuff.

// Build the broadphase
btBroadphaseInterface* broadphase = new btDbvtBroadphase();

// Set up the collision configuration and dispatcher
btDefaultCollisionConfiguration* collisionConfiguration = new btDefaultCollisionConfiguration();
btCollisionDispatcher* dispatcher = new btCollisionDispatcher(collisionConfiguration);

// The actual physics solver
btSequentialImpulseConstraintSolver* solver = new btSequentialImpulseConstraintSolver;

// The world.
btDiscreteDynamicsWorld* dynamicsWorld = new btDiscreteDynamicsWorld(dispatcher,broadphase,solver,collisionConfiguration);
dynamicsWorld->setGravity(btVector3(0,-9.81f,0));
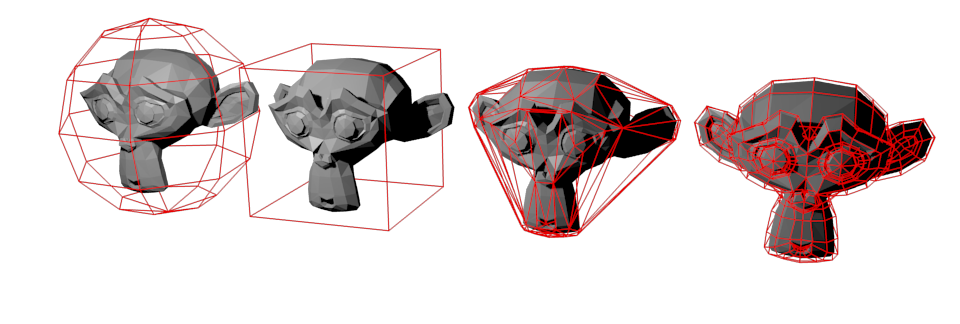
Each object must have a Collision Shape. While this collision shape can be the mesh itself, it’s often a bad idea for performance. Instead, one usually use much simpler shapes as boxes, spheres or capsules. Here are a few collision shapes. From left to right : sphere, cube, convex hull of the mesh, original mesh. Spheres are less precise than the full mesh, but much much faster to test.
In this example, all meshes will use the same box :
btCollisionShape* boxCollisionShape = new btBoxShape(btVector3(1.0f, 1.0f, 1.0f));
Physics engines don’t know anything about OpenGL; and in fact, all of them can run without any 3D visualization at all. So you can’t directly give Bullet your VBO. You have to add a Rigid Body in the simulation instead.
btDefaultMotionState* motionstate = new btDefaultMotionState(btTransform(
	btQuaternion(orientations[i].x, orientations[i].y, orientations[i].z, orientations[i].w),
	btVector3(positions[i].x, positions[i].y, positions[i].z)
));

btRigidBody::btRigidBodyConstructionInfo rigidBodyCI(
	0,                  // mass, in kg. 0 -> Static object, will never move.
	motionstate,
	boxCollisionShape,  // collision shape of body
	btVector3(0,0,0)    // local inertia
);
btRigidBody *rigidBody = new btRigidBody(rigidBodyCI);

dynamicsWorld->addRigidBody(rigidBody);
Notice that the Rigid Body use the Collision Shape to determine its shape.
We also keep track of this rigid body, but as the comment says, a real engine would somehow have a MyGameObject class with the position, the orientation, the OpenGL mesh, and a pointer to the Rigid Body.
rigidbodies.push_back(rigidBody);

// Small hack : store the mesh's index "i" in Bullet's User Pointer.
// Will be used to know which object is picked.
// A real program would probably pass a "MyGameObjectPointer" instead.
rigidBody->setUserPointer((void*)i);
In other words : please don’t use the above code in real life ! It’s just for demo purpose.
Raycasting
Finding the ray direction
First, we need to find a ray which starts at the camera and goes “through the mouse”. This is done in the ScreenPosToWorldRay() function.
First, we find the ray’s start and end position in Normalized Device Coordinates. We do it in this space because it’s very easy :
// The ray Start and End positions, in Normalized Device Coordinates (Have you read Tutorial 4 ?)
glm::vec4 lRayStart_NDC(
	((float)mouseX/(float)screenWidth  - 0.5f) * 2.0f, // [0,1024] -> [-1,1]
	((float)mouseY/(float)screenHeight - 0.5f) * 2.0f, // [0, 768] -> [-1,1]
	-1.0, // The near plane maps to Z=-1 in Normalized Device Coordinates
	1.0f
);
glm::vec4 lRayEnd_NDC(
	((float)mouseX/(float)screenWidth  - 0.5f) * 2.0f,
	((float)mouseY/(float)screenHeight - 0.5f) * 2.0f,
	0.0,
	1.0f
);
To understand this code, let’s have a look at this picture from Tutorial 4 again :
NDC is a 222 cube centered on the origin, so in this space, the ray going “trough the mouse” is just a straight line, perpendicular to the near plane! Which makes lRayStart_NDC and lEndStart_NDC so easy to compute.
Now we simply have to apply the inverse transformation as the usual one :
// The Projection matrix goes from Camera Space to NDC.
// So inverse(ProjectionMatrix) goes from NDC to Camera Space.
glm::mat4 InverseProjectionMatrix = glm::inverse(ProjectionMatrix);

// The View Matrix goes from World Space to Camera Space.
// So inverse(ViewMatrix) goes from Camera Space to World Space.
glm::mat4 InverseViewMatrix = glm::inverse(ViewMatrix);

glm::vec4 lRayStart_camera = InverseProjectionMatrix * lRayStart_NDC;    lRayStart_camera/=lRayStart_camera.w;
glm::vec4 lRayStart_world  = InverseViewMatrix       * lRayStart_camera; lRayStart_world /=lRayStart_world .w;
glm::vec4 lRayEnd_camera   = InverseProjectionMatrix * lRayEnd_NDC;      lRayEnd_camera  /=lRayEnd_camera  .w;
glm::vec4 lRayEnd_world    = InverseViewMatrix       * lRayEnd_camera;   lRayEnd_world   /=lRayEnd_world   .w;

// Faster way (just one inverse)
//glm::mat4 M = glm::inverse(ProjectionMatrix * ViewMatrix);
//glm::vec4 lRayStart_world = M * lRayStart_NDC; lRayStart_world/=lRayStart_world.w;
//glm::vec4 lRayEnd_world   = M * lRayEnd_NDC  ; lRayEnd_world  /=lRayEnd_world.w;
With lRayStart_worldspace and lRayEnd_worldspace, the ray’s direction (in world space) is straightforward to compute :
glm::vec3 lRayDir_world(lRayEnd_world - lRayStart_world);
lRayDir_world = glm::normalize(lRayDir_world);
Using rayTest()
Raycasting is very simple, no need for special comments :
out_direction = out_direction*1000.0f;

btCollisionWorld::ClosestRayResultCallback RayCallback(
	btVector3(out_origin.x, out_origin.y, out_origin.z),
	btVector3(out_direction.x, out_direction.y, out_direction.z)
);
dynamicsWorld->rayTest(
	btVector3(out_origin.x, out_origin.y, out_origin.z),
	btVector3(out_direction.x, out_direction.y, out_direction.z),
	RayCallback
);

if(RayCallback.hasHit()) {
	std::ostringstream oss;
	oss << "mesh " << (int)RayCallback.m_collisionObject->getUserPointer();
	message = oss.str();
}else{
	message = "background";
}
The only thing is that for some weird reason, you have to set the ray’s start and direction twice.
That’s it, you know how to implement picking with Bullet !
Pro and cons
Pros :
- Very easy when you already have a physics engine
- Fast
- Doesn’t impact OpenGL’s performance
Cons :
- Probably not the right solution if you don’t need any physics or collision engine
Final remarks
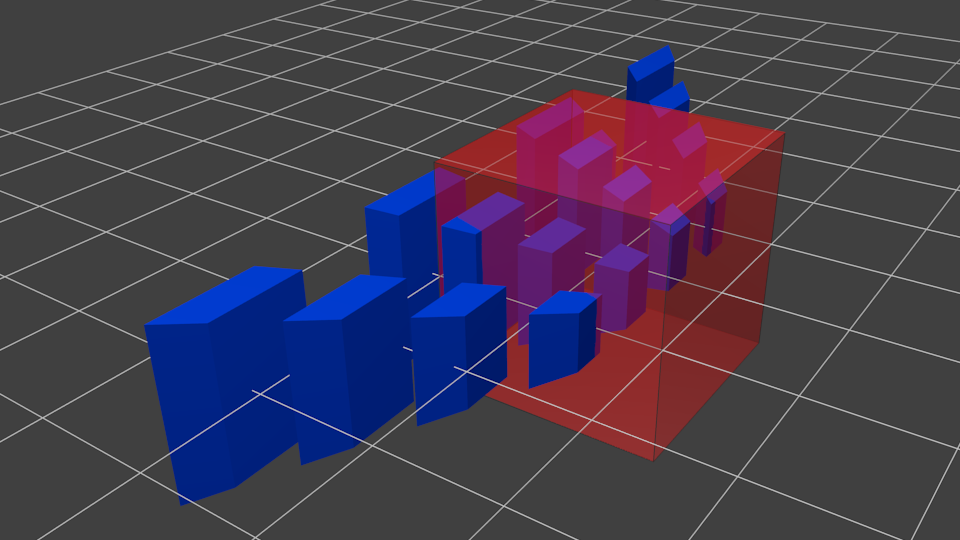
All physics engines have a debug viewer. The example code shows how to to it with Bullet. You end up with a representation of what Bullet knows about your scene, which is incredibly useful to debug physics-related problem, especially to be sure that the “visual world” is consistent with the “physics world” :

The green box is the Collision Shape, at the same position and orientation than the mesh. The red box is the object’s Axis-Aligned Bounding Box (AABB), which is used as a faster rejection test : if the ray doesn’t intersect the AABB (very cheap to compute), then there is no chance that it will intersect the collision shape. Finally, you can see the object’s axes in blue and red (look at the nose and ear). Handy !