Picking with an OpenGL hack
This technique is not really recommended, but it’s an easy and fast way to add simple picking. By all means, avoid using this in a game, since it might introduce noticeable framerate drops. However, if you have some kind of simulation and you don’t really care about picking performance, this might the perfect option.
Source code for this tutorial is available in misc05_picking/misc05_picking_slow_easy.cpp, which is a quite meaningful name.
Basic idea
The idea behind this technique is to render the scene as usual, but instead of using a nice shading, you render each mesh with a specific and unique color.
Then, you retrieve the colour of the pixel under the mouse cursor and convert this color back to the original identifier. You have your clicked object.
Here’s an example :
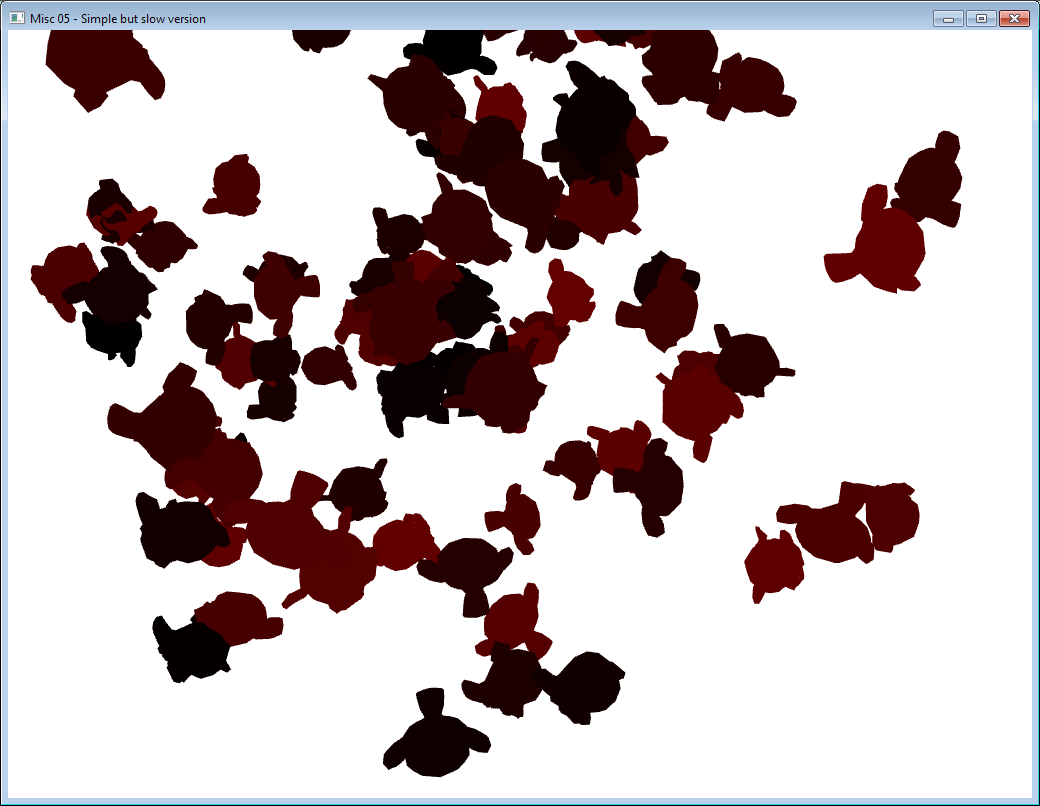
In this screenshot, each monkey has a slightly different color, which make is possible to uniquely identify them.
Of course, you don’t want to see the image with all these weird colors, so you also have to clear the screen and re-draw as usual.
Implementation
Giving an ID to every object
Each object of the scene will need a unique color. The easiest way to do this is to give each object an identifying integer, and convert it to a color. This color doesn’t have to have a meaning; this technique is just a hack anyway.
In the accompanying source code, 100 objects are created and stored in a std::vector, so the ID is just the index of the object in the vector. If you have a more complex hierarchy, you’ll probably need to add the ID to your Mesh class, and maintain some sort of std::map to associate the ID with the desired object.
Detecting the click
In this simple example, the picking is done each frame where the left mouse button is down :
if (glfwGetMouseButton(GLFW_MOUSE_BUTTON_LEFT)){
In a real application, you probably want to do this only when the user just released the button, so you’ll have to store a bool wasLeftMouseButtonPressedLastFrame; or, better, use glfwSetMouseButtonCallback() (read GLFW’s manual to know how to use this).
Convert your ID into a special color
Since we’re going to render each mesh with a different color, the first step is to compute this color. An easy way to do this is to put the least signifying bits in the red channels, and the most significant bits in the blue channel :
// Convert "i", the integer mesh ID, into an RGB color
int r = (i & 0x000000FF) >>  0;
int g = (i & 0x0000FF00) >>  8;
int b = (i & 0x00FF0000) >> 16;
This might seem scary, but it’s standard bit-manipulation code. You end up with 3 integers, each in the [0-255] range. With this scheme, you can represent 255^3 = 16 million different meshes, which is probably enough.
Drawing the scene with this color
We now need a shader to use this color. It’s very simple. The vertex shader does nothing :
#version 330 core

// Input vertex data, different for all executions of this shader.
layout(location = 0) in vec3 vertexPosition_modelspace;

// Values that stay constant for the whole mesh.
uniform mat4 MVP;

void main(){

    // Output position of the vertex, in clip space : MVP * position
    gl_Position =  MVP * vec4(vertexPosition_modelspace,1);

}
and the fragment shader simply writes the desired color in the framebuffer :
#version 330 core

// Ouput data
out vec4 color;

// Values that stay constant for the whole mesh.
uniform vec4 PickingColor;

void main(){

    color = PickingColor;

}
Easy !
The only trick is that you have to send your color as floats (in [0,1]) but you have integers (in [0,255]), so you have to make a small division when calling glUniformXX() :
// OpenGL expects colors to be in [0,1], so divide by 255.
glUniform4f(pickingColorID, r/255.0f, g/255.0f, b/255.0f, 1.0f);
You can now draw the meshes as usual (glBindBuffer, glVertexAttribPointer, glDrawElements) and you’ll get the weird picture above.
Get the color under the mouse
When you have drawn all meshes (probably with a for() loop), you need to call glReadPixels(), which will retrieve the rasterized pixels on the CPU. But for this function to work, a few more calls are needed.
First, you need to call glFlush(). This will tell the OpenGL driver to send all the pending commands (including your latest glDrawXX) to the GPU. This is typically not done automatically, because commands are sent in batches, and not immediately (this means that when you call glDrawElements(), nothing is actually draw. It WILL be drawn a few milliseconds later). This operation is SLOW.
Then, you need to call glFinish(), which will wait until everything is really drawn. The difference with glFlush() is that glFlush() just sends the commands; glFinish() waits for these commands to be executed. This operation is SLOOOW.
You also need to configure how glReadPixels will behave with respect to memory alignment. This is a bit off-topic, but you simply need to call glPixelStorei(GL_UNPACK_ALIGNMENT, 1).
And finally, you can call glReadPixels ! Here is the full code :
// Wait until all the pending drawing commands are really done.
// Ultra-mega-over slow !
// There are usually a long time between glDrawElements() and
// all the fragments completely rasterized.
glFlush();
glFinish();

glPixelStorei(GL_UNPACK_ALIGNMENT, 1);

// Read the pixel at the center of the screen.
// You can also use glfwGetMousePos().
// Ultra-mega-over slow too, even for 1 pixel,
// because the framebuffer is on the GPU.
unsigned char data[4];
glReadPixels(1024/2, 768/2,1,1, GL_RGBA, GL_UNSIGNED_BYTE, data);
Your color is now in the ‘data’ array. Here, you can see that the ID is 19.

Convert the color back to an ID
You can now reconstruct your ID from the ‘data’ buffer. The code is the complete opposite from the id-to-color code :
// Convert the color back to an integer ID
int pickedID =
	data[0] +
	data[1] * 256 +
	data[2] * 256*256;
Use this ID
You can now use this ID for whatever you need. In the example, the text in the GUI is updated, but of course, you can do whatever you want.
if (pickedID == 0x00ffffff){ // Full white, must be the background !
	message = "background";
}else{
	std::ostringstream oss; // C++ strings suck
	oss << "mesh " << pickedID;
	message = oss.str();
}
Pros and cons
Pros :
- Easy, fast to implement
- No need for external library, or complicated math
Cons :
- Use glFlush(), glFinish(), glReadPixels(), all of which are notoriously slow, because they force the CPU to wait for the GPU, which ruins performance.
- You don’t have more precise information : which exact triangle was hit, normal at this point, etc.
Final remarks
While not very recommended, this technique can be really useful; but it’s quite restricted to picking. The methods in the two other tutorials can be used for other purposes, like detecting collisions, making an avatar walk on the ground, visibility queries for AIs, etc.
If you end up using this technique, and you need to pick several points in a single frame, you should do all these points at once. For instance, if you need to handle 5 touch inputs, don’t draw the scene 5 times !