Tutorial 4 : 색깔이 입혀진 육면체
네번째 튜토리얼에 오신 것을 환영합니다! 이번에는 다음 내용들을 배워보겠습니다. :
- 단순한 삼각형 대신 육면체를 그리기
- 좀 멋진 색깔 입히기
- Z-Buffer가 무엇인지 배우기
육면체 그리기
하나의 육면체는 6개의 사각 면으로 되어 있습니다. OpenGL은 삼각형만 처리 할 수 있기 때문에, 우리는 12개의 삼각형을 그려야 합니다. 사각면 하나 당 2개의 삼각형이 필요합니다. 삼각형을 그릴 때와 같은 방법으로 Vertex들을 정의합니다.
// 우리 Vertex들입니다. 3개의 연속 된 float 숫자가 하나의 3차원 Vertex입니다.
// 3개의 연속 된 Vertex들이 하나의 삼각형을 정의합니다.
// 하나의 육면체는 2개의 삼각형으로 이루어진 면 6개를 가지고 있고,
// 그래서 총 6*2=12개의 삼각형, 12*3 개의 Vertex를 가지고 있습니다.
static const GLfloat g_vertex_buffer_data[] = {
    -1.0f,-1.0f,-1.0f, // triangle 1 : begin
    -1.0f,-1.0f, 1.0f,
    -1.0f, 1.0f, 1.0f, // triangle 1 : end
    1.0f, 1.0f,-1.0f, // triangle 2 : begin
    -1.0f,-1.0f,-1.0f,
    -1.0f, 1.0f,-1.0f, // triangle 2 : end
    1.0f,-1.0f, 1.0f,
    -1.0f,-1.0f,-1.0f,
    1.0f,-1.0f,-1.0f,
    1.0f, 1.0f,-1.0f,
    1.0f,-1.0f,-1.0f,
    -1.0f,-1.0f,-1.0f,
    -1.0f,-1.0f,-1.0f,
    -1.0f, 1.0f, 1.0f,
    -1.0f, 1.0f,-1.0f,
    1.0f,-1.0f, 1.0f,
    -1.0f,-1.0f, 1.0f,
    -1.0f,-1.0f,-1.0f,
    -1.0f, 1.0f, 1.0f,
    -1.0f,-1.0f, 1.0f,
    1.0f,-1.0f, 1.0f,
    1.0f, 1.0f, 1.0f,
    1.0f,-1.0f,-1.0f,
    1.0f, 1.0f,-1.0f,
    1.0f,-1.0f,-1.0f,
    1.0f, 1.0f, 1.0f,
    1.0f,-1.0f, 1.0f,
    1.0f, 1.0f, 1.0f,
    1.0f, 1.0f,-1.0f,
    -1.0f, 1.0f,-1.0f,
    1.0f, 1.0f, 1.0f,
    -1.0f, 1.0f,-1.0f,
    -1.0f, 1.0f, 1.0f,
    1.0f, 1.0f, 1.0f,
    -1.0f, 1.0f, 1.0f,
    1.0f,-1.0f, 1.0f
};
OpenGL 버퍼는 표준 함수들을(glGenBuffers, glBindBuffer, glBufferData, glVertexAttribPointer) 이용해서 생성되고, 연결되고(bound), 채워지고, 설정 됩니다. 잠시 Tutorial 2를 복습 겸 살펴보셔도 좋겠습니다. draw call(억지로 한글로 번역하면 이상해서 그냥 draw call 그대로 사용)도 같습니다. 그냥 그려져야 할 정확한 Vertex의 개수만 설정 해 주면 됩니다.:
// 삼각형 그리기
glDrawArrays(GL_TRIANGLES, 0, 12*3); // 12*3 indices starting at 0 -> 12 triangles -> 6 squares
이 코드에서 주목 할 몇 가지 :
- 지금은 우리 3D 모델이 고정되어 있습니다. 모델을 수정하려면 소스 코드를 고치고 다시 어플리케이션을 컴파일하고~~ 잘 되길 바래야 합니다.^^ Tutorial 7에서 동적인 모델을 로딩 하는 방법을 배우게 됩니다.
- 실제로는 각 Vertex가 적어도 3번 적혀 있습니다.(“-1.0f,-1.0f,-1.0f”을 위 코드에서 한번 찾아보세요.). 이건 정말 심각한 메모리 낭비입니다. Tutorial 9에서 어떻게 다룰 지 배우겠습니다.
이제 흰 바탕에 육면체를 그리는데 필효한 것은 다 준비 되었습니다. 쉐이더를 써보세요! 쫄지말고 한번 시도해 보세요. ^^
Adding colors
A color is, conceptually, exactly the same as a position : it’s just data. In OpenGL terms, they are “attributes”. As a matter of fact, we already used this with glEnableVertexAttribArray() and glVertexAttribPointer(). Let’s add another attribute. The code is going to be very similar.
First, declare your colors : one RGB triplet per vertex. Here I generated some randomly, so the result won’t look that good, but you can do something better, for instance by copying the vertex’s position into its own color.
// One color for each vertex. They were generated randomly.
static const GLfloat g_color_buffer_data[] = {
    0.583f,  0.771f,  0.014f,
    0.609f,  0.115f,  0.436f,
    0.327f,  0.483f,  0.844f,
    0.822f,  0.569f,  0.201f,
    0.435f,  0.602f,  0.223f,
    0.310f,  0.747f,  0.185f,
    0.597f,  0.770f,  0.761f,
    0.559f,  0.436f,  0.730f,
    0.359f,  0.583f,  0.152f,
    0.483f,  0.596f,  0.789f,
    0.559f,  0.861f,  0.639f,
    0.195f,  0.548f,  0.859f,
    0.014f,  0.184f,  0.576f,
    0.771f,  0.328f,  0.970f,
    0.406f,  0.615f,  0.116f,
    0.676f,  0.977f,  0.133f,
    0.971f,  0.572f,  0.833f,
    0.140f,  0.616f,  0.489f,
    0.997f,  0.513f,  0.064f,
    0.945f,  0.719f,  0.592f,
    0.543f,  0.021f,  0.978f,
    0.279f,  0.317f,  0.505f,
    0.167f,  0.620f,  0.077f,
    0.347f,  0.857f,  0.137f,
    0.055f,  0.953f,  0.042f,
    0.714f,  0.505f,  0.345f,
    0.783f,  0.290f,  0.734f,
    0.722f,  0.645f,  0.174f,
    0.302f,  0.455f,  0.848f,
    0.225f,  0.587f,  0.040f,
    0.517f,  0.713f,  0.338f,
    0.053f,  0.959f,  0.120f,
    0.393f,  0.621f,  0.362f,
    0.673f,  0.211f,  0.457f,
    0.820f,  0.883f,  0.371f,
    0.982f,  0.099f,  0.879f
};
The buffer is created, bound and filled in the exact same way as the previous one :
GLuint colorbuffer;
glGenBuffers(1, &colorbuffer);
glBindBuffer(GL_ARRAY_BUFFER, colorbuffer);
glBufferData(GL_ARRAY_BUFFER, sizeof(g_color_buffer_data), g_color_buffer_data, GL_STATIC_DRAW);
The configuration is also identical :
// 2nd attribute buffer : colors
glEnableVertexAttribArray(1);
glBindBuffer(GL_ARRAY_BUFFER, colorbuffer);
glVertexAttribPointer(
    1,                                // attribute. No particular reason for 1, but must match the layout in the shader.
    3,                                // size
    GL_FLOAT,                         // type
    GL_FALSE,                         // normalized?
    0,                                // stride
    (void*)0                          // array buffer offset
);
Now, in the vertex shader, we have access to this additional buffer :
// Notice that the "1" here equals the "1" in glVertexAttribPointer
layout(location = 1) in vec3 vertexColor;
In our case, we won’t do anything fancy with it in the vertex shader. We will simply forward it to the fragment shader :
// Output data ; will be interpolated for each fragment.
out vec3 fragmentColor;

void main(){

    [...]

    // The color of each vertex will be interpolated
    // to produce the color of each fragment
    fragmentColor = vertexColor;
}
In the fragment shader, you declare fragmentColor again :
// Interpolated values from the vertex shaders
in vec3 fragmentColor;
… and copy it in the final output color :
// Ouput data
out vec3 color;

void main(){
    // Output color = color specified in the vertex shader,
    // interpolated between all 3 surrounding vertices
    color = fragmentColor;
}
And that’s what we get :
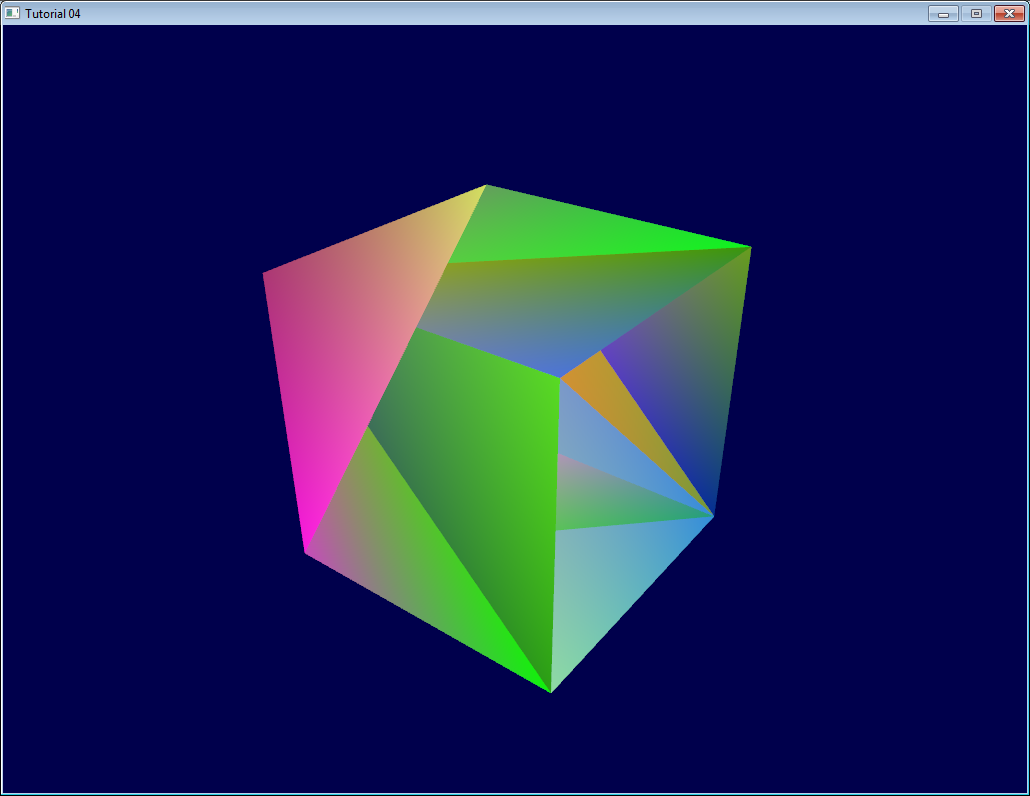
Urgh. Ugly. To understand what happens, here’s what happens when you draw a “far” triangle and a “near” triangle :
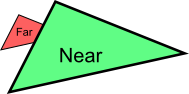
Seems OK. Now draw the “far” triangle last :
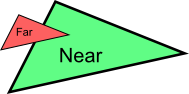
It overdraws the “near” one, even though it’s supposed to be behind it ! This is what happens with our cube : some faces are supposed to be hidden, but since they are drawn last, they are visible. Let’s call the Z-Buffer to the rescue !
Quick Note 1 : If you don’t see the problem, change your camera position to (4,3,-3)
Quick Note 2 : if “color is like position, it’s an attribute”, why do we need to declare out vec3 fragmentColor; and in vec3 fragmentColor; for the color, and not for the position ? Because the position is actually a bit special : It’s the only thing that is compulsory (or OpenGL wouldn’t know where to draw the triangle !). So in the vertex shader, gl_Position is a “built-in” variable.
The Z-Buffer
The solution to this problem is to store the depth (i.e. “Z”) component of each fragment in a buffer, and each and every time you want to write a fragment, you first check if you should (i.e the new fragment is closer than the previous one).
You can do this yourself, but it’s so much simpler to just ask the hardware to do it itself :
// Enable depth test
glEnable(GL_DEPTH_TEST);
// Accept fragment if it closer to the camera than the former one
glDepthFunc(GL_LESS);
You also need to clear the depth each frame, instead of only the color :
// Clear the screen
glClear(GL_COLOR_BUFFER_BIT | GL_DEPTH_BUFFER_BIT);
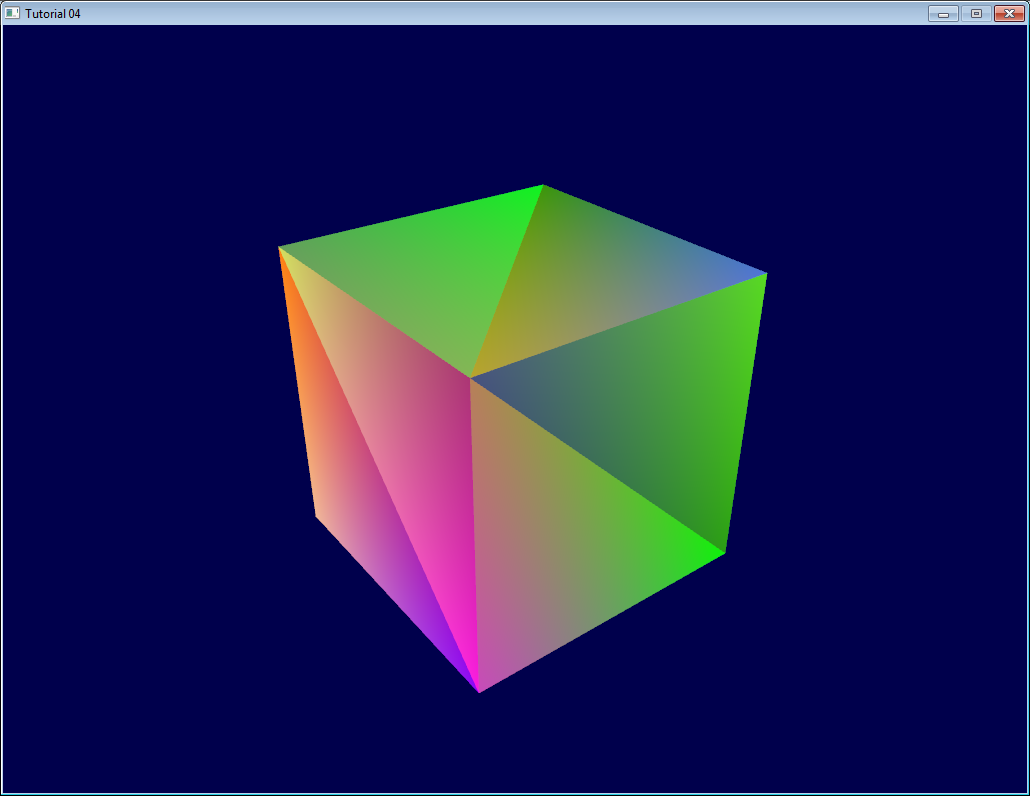
And this is enough to solve all your problems.
Exercises
-
Draw the cube AND the triangle, at different locations. You will need to generate 2 MVP matrices, to make 2 draw calls in the main loop, but only 1 shader is required.
-
Generate the color values yourself. Some ideas : At random, so that colors change at each run; Depending on the position of the vertex; a mix of the two; Some other creative idea :) In case you don’t know C, here’s the syntax :
static GLfloat g_color_buffer_data[12*3*3];
for (int v = 0; v < 12*3 ; v++){
    g_color_buffer_data[3*v+0] = your red color here;
    g_color_buffer_data[3*v+1] = your green color here;
    g_color_buffer_data[3*v+2] = your blue color here;
}
- Once you’ve done that, make the colors change each frame. You’ll have to call glBufferData each frame. Make sure the appropriate buffer is bound (glBindBuffer) before !