Building your own C application
A lot of efforts have been made so that these tutorials are as simple to compile & run as possible. Unfortunately, this also means that CMakes hides how to do that on your own project.
So, this tutorial will explain how to build your own C application from scatch. But first, you need a basic knowledge of what the compiler actually does.
Please don’t skip the first two sections. If you’re reading this tutorial, you probably need to know this stuff.
The C application model
Preprocessing
This is what all those #defines and #includes are about.
C preprocessing is a very simple process : cut’n pasting.
When the preprocessor sees the following MyCode.c :
#include "MyHeader.h"

void main(){
    FunctionDefinedInHeader();
}
, it simply opens the file MyHeader.h, and cut’n pastes its contents into MyCode.c :
// Begin of MyCode.c
// Begin of MyHeader.h
#ifndef MYHEADER_H
#define MYHEADER_H

void FunctionDefinedInHeader(); // Declare the function

# endif
// End of MyHeader.h

void main(){
    FunctionDefinedInHeader(); // Use it
}

// End of MyCode
Similarly, #defines are cut’n pasted, #ifs are analysed and potentially removed, etc.
At the end of this step we have a preprocessed C++ file, without any #define, #if, #ifdef, #include, ready to be compiled.
As an example, here is the main.cpp file of the 6th tutorial, fully preprocessed in Visual : tutorial06_preprocessed. Warning, it’s a huge file ! But it’s worth knowing what a seemingly simple .cpp really looks to the compiler.
Compilation
The compiler translates C++ code into a representation that the CPU can directly understand. For instance, the following code :
int i=3;
int j=4*i+2;
will be translated into this : x86 opcodes.
mov         dword ptr [i],3
mov         eax,dword ptr [i]
lea         ecx,[eax*4+2]
mov         dword ptr [j],ecx
Each .cpp file is compiled separately, and the resulting binary code is written in .o/.obj files.
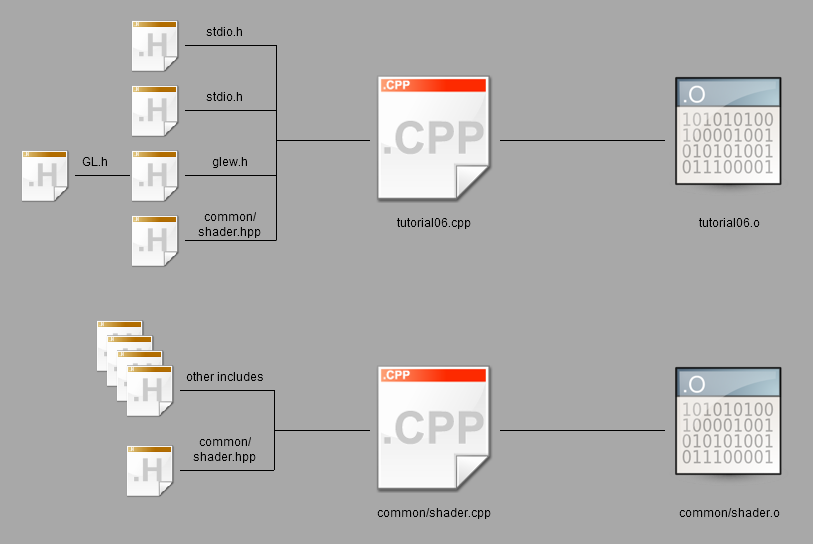
Note that we don’t have an executable yet : one remaining step is needed.
Linking
The linker takes all the binary code (yours, and the one from external libraries), and generates the final executable. A few notes :
- A library has the .lib extension.
- Some libraries are static. This means that the .lib contains all the x86 opcodes needed.
- Some library are dynamic ( also said shared ). This means that the .lib doesn’t contain any x86 code; it simply says “I swear that functions Foo, Bar and WhatsNot will be available at runtime”.
When the linker has run, you have an executable (.exe on Windows, .nothing_at_all on unix) :

Runtime
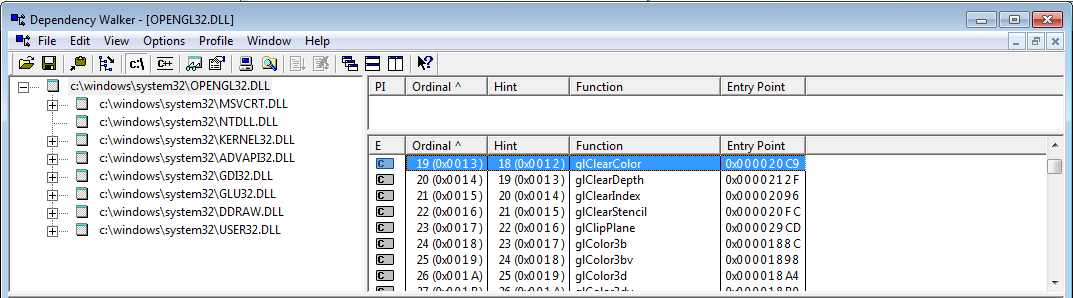
When you launch the executable, the OS will open the .exe, and put the x86 opcodes in memory. As said earlier, some code isn’t available at this point : the code from dynamic libraries. But the linker was nice enough to say where to look for it : the .exe clearly says that the glClearColor function is implemented in OpenGL32.dll.

Windows will happily open the .dll and find glClearColor :
Sometimes a .dll can’t be found, probably because you screwed the installation process, and the program just can’t be run.
How do I do X with IDE Y ?
The instructions on how to build an OpenGL application are separated from the following basic operations. This is on purpose :
- First, you’ll need to do these thinks all of the time, so you’d better know them well
- Second, you will know what is OpenGL-specific and what is not.
Visual Studio
Creating a new project
File -> New -> Project -> Empty project. Don’t use any weird wizard. Don’t use any option you may not know about (disable MFC, ATL, precompiled headers, stdafx, main file).
Adding a source file in a project
Right clic on Source Files -> Add new.
Adding include directories
Right clic on project -> Project Properties -> C++ -> General -> Additional include directories. This is actually a dropdown list, you can modify the list conveniently.
Link with a library
Right clic on project -> Project Properties -> Linker -> Input -> Additional dependencies : type the name of the .lib. For instance : opengl32.lib
In Project Properties -> Linker -> General -> Additional library directories, make sure that the path to the above library is present.
Build, Run & Debug
Setting the working directory (where your textures & shaders are) : Project Properties -> Debugging -> Working directory
Running : Shift-F5; but you’ll probably never need to do that. Debug instead : F5
A short list of debugging shortcuts :
- F9 on a line, or clicking on the left of the line number: setting a breakpoint. A red dot will appear.
- F10 : execute current line
- F11 : execute current line, but step into the functions this line is calling (“step into”)
- Shift-F11 : run until the end of the function (“step out”)
You also have plenty of debugging windows : watched variables, callstack, threads, …
QtCreator
QtCreator is available for free at http://qt-project.org/.
Creating a new project
Use a plain C or C++ project; avoid the templates filled with Qt stuff.
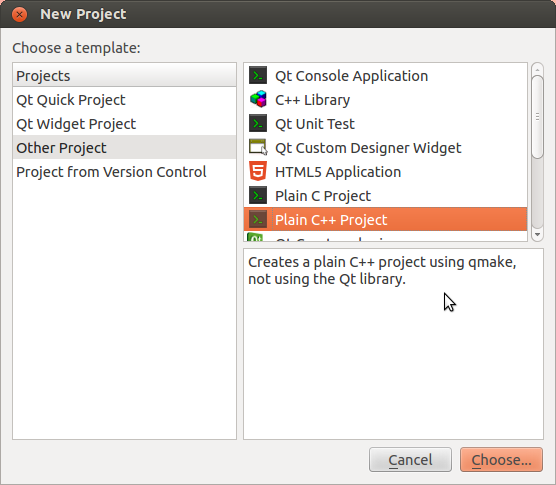
Use default options.
Adding a source file in a project
Use the GUI, or add the file in the .pro :
SOURCES += main.cpp \
           other.cpp \
           foo.cpp
Adding include directories
In the .pro file :
<code>INCLUDEPATH += <your path> \ <other path> </code>
Link with a library
Right clic on project -> Add library
- If you’re on Linux and you installed the library with apt-get or similar, chances are that the library registered itself in the system. You can select “System package” and enter the name of the library ( ex : libglfw or glew )
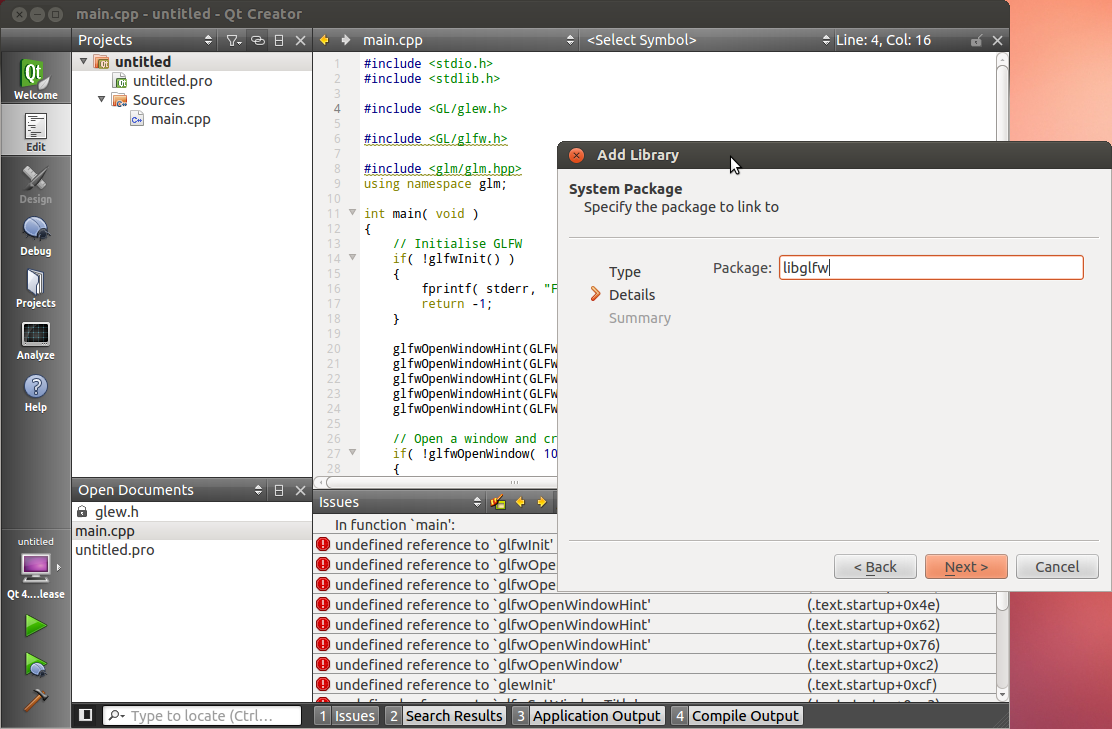
- If not, use “System Library”. Browse to where you compiled it.
Build, Run & Debug
Building : Ctrl-B, or the hammer on the bottom left corner.
Running : the green arrow. You can set the program’s arguments and working directory in Projects -> Run Settings
Debugging :
- Setting a breakpoint : Click on the left of the line number. A red dot will appear.
- F10 : execute current line
- F11 : execute current line, but step into the functions this line is calling (“step into”)
- Shift-F11 : run until the end of the function (“step out”)
You also have plenty of debugging windows : watched variables, callstack, threads, …
XCode
Work in progress…
Creating a new project
Adding a source file in a project
Adding include directories
Link with a library
Build, Run & Debug
CMake
CMake will create projects for almost any software building tool : Visual, QtCreator, XCode, make, Code::Blocks, Eclipse, etc, on any OS. This frees you from maintaining many project files.
Creating a new project
Create a CMakeLists.txt file and write the following inside (adapt if needed) :
cmake_minimum_required (VERSION 2.6)
project (your_project_name)

find_package(OpenGL REQUIRED)

add_executable(your_exe_name
    tutorial04_colored_cube/tutorial04.cpp
    common/shader.cpp
    common/shader.hpp
)
Launch the CMake GUI, browse to your .txt file, and select your build folder. Click Configure, then Generate. Your solution will be created in the build folder.
Adding a source file in a project
Simply add a line in the add_executable command.
Adding include directories
include_directories(
    external/AntTweakBar-1.15/include/
    external/glfw-2.7.2/include/
    external/glm-0.9.1/
    external/glew-1.5.8/include/
    .
)
Link with a library
set(ALL_LIBS
    ${OPENGL_LIBRARY}
    GLFW_272
    GLEW_158
    ANTTWEAKBAR_151_OGLCORE_GLFW
)

target_link_libraries(tutorial01_first_window
    ${ALL_LIBS}
)
Build, Run & Debug
CMake doesn’t do that. Use your favourite IDE.
make
Please, just don’t use that.
gcc
It might be worth compiling a small project “by hand” in order to gain a better comprehension of the workflow. Just don’t do this on a real project…
Note that you can also do that on Windows using mingw.
Compile each .cpp file separately :
g++ -c main.cpp
g++ -c tools.cpp
As said above, you will have a main.o and a tools.o files. Link them :
g++ main.o tools.o
a a.out file appeared; It’s your executable, run it :
./a.out
That’s it !
Building your own C application
Armed with this knowledge, we can start building our own OpenGL application.
- Download the dependencies : Here we use GLFW, GLEW and GLM, but depending on your project, you might need something different. Save same preferably in a subdirectory of your project (for instance : external/)
- They should be pre-compiled for your platform. GLM doesn’t have to be compiled, though.
- Create a new project with the IDE of your choice
- Add a new .cpp file in the project
- Copy and paste, for instance, the following code (this is actually playground.cpp) :
#include <stdio.h>
#include <stdlib.h>

#include <GL/glew.h>

#include <GL/glfw.h>

#include <glm/glm.hpp>
using namespace glm;

int main( void )
{
	// Initialise GLFW
	if( !glfwInit() )
	{
		fprintf( stderr, "Failed to initialize GLFW\n" );
		return -1;
	}

	glfwOpenWindowHint(GLFW_FSAA_SAMPLES, 4);
	glfwOpenWindowHint(GLFW_WINDOW_NO_RESIZE,GL_TRUE);
	glfwOpenWindowHint(GLFW_OPENGL_VERSION_MAJOR, 3);
	glfwOpenWindowHint(GLFW_OPENGL_VERSION_MINOR, 3);
	glfwOpenWindowHint(GLFW_OPENGL_PROFILE, GLFW_OPENGL_CORE_PROFILE);

	// Open a window and create its OpenGL context
	if( !glfwOpenWindow( 1024, 768, 0,0,0,0, 32,0, GLFW_WINDOW ) )
	{
		fprintf( stderr, "Failed to open GLFW window. If you have an Intel GPU, they are not 3.3 compatible. Try the 2.1 version of the tutorials.\n" );
		glfwTerminate();
		return -1;
	}

	// Initialize GLEW
	if (glewInit() != GLEW_OK) {
		fprintf(stderr, "Failed to initialize GLEW\n");
		return -1;
	}

	glfwSetWindowTitle( "Playground" );

	// Ensure we can capture the escape key being pressed below
	glfwEnable( GLFW_STICKY_KEYS );

	// Dark blue background
	glClearColor(0.0f, 0.0f, 0.3f, 0.0f);

	do{
		// Draw nothing, see you in tutorial 2 !

		// Swap buffers
		glfwSwapBuffers();

	} // Check if the ESC key was pressed or the window was closed
	while( glfwGetKey( GLFW_KEY_ESC ) != GLFW_PRESS &&
		   glfwGetWindowParam( GLFW_OPENED ) );

	// Close OpenGL window and terminate GLFW
	glfwTerminate();

	return 0;
}
- Compile the project.
You will have many compiler errors. We will analyse all of them, one by one.
Troubleshooting
The error messages below are for Visual Studio 2010, but they are more or less similar on GCC.
Visual Studio - fatal error C1083: Cannot open filetype file: ‘GL/glew.h’ : No such file or directory
(or whichever other file)
Some headers are in weird locations. For instance, GLEW include files are located in external/glew-x.y.z/include/. The compiler has no way to magically guess this, so you have to tell him. In the project settings, add the appropriate path in the COMPILER (not linker) options.
Under no circumstance you should copy files in the compiler’s default directory (Program Files/Visual Studio/…). Technically, this will work, but it’s very bad practice.
Also, it’s good practice to use relative paths ( ./external/glew/… instead of C:/Users/username/Downloads/… )
As an example, this is what the tutorial’s CMake use :
external/glfw-2.7.2/include
external/glm-0.9.1
external/glew-1.5.8/include
Repeat until all files are found.
GCC - fatal error: GL/glew.h: No such file or directory
(or whichever other file)
This means that the library is not installed. If you’re lucky, the library is well-known and you just have to install it. This is the case for GLFW, GLEW and GLM :
sudo apt-get install libglfw-dev libglm-dev libglew1.6-dev
If this is not a widespread library, see the answer for Visual Studio above.
Visual Studio - error LNK2019: unresolved external symbol glfwGetWindowParam referenced in function main
(or whichever other symbol in whichever other function)
Congratulations ! You have a linker error. This is excellent news : this means that the compilation succeeded. Just one last step !
glfw functions are in an external library. You have to tell the linker about this library. Add it in the linker options. Don’t forget to add the path to the library.
As an example, this is what the Visual project use. The names are a bit unusual because this is a custom build. What’s more, GLM doesn’t need to be compiled or linked, so it’s not here.
external\Debug\GLFW_272.lib
external\Debug\GLEW_158.lib
If you download these libraries from SourceForge (GLFW, GLEW) and build a library yourself, you have to specify the correct path. For instance :
C:\Where\You\Put\The\Library\glfw.lib
C:\Where\You\Put\The\Other\Library\glew32.lib
GCC - main.cpp: undefined reference to `glfwInit’
(or whichever other symbol in whichever other file)
Same answer than for Visual Studio.
Note that on Linux, GLFW and GLEW (and many others) are usually installed with apt-get or similar : sudo apt-get install libglew-dev libglfw-dev (may vary). When you do that, the library is copied in the compiler’s standard directory, so you don’t have to specify the path. Just link to glfw and glew as shown in the 1rst section.
I set everything right, but I still have an “unresolved external symbol” error !
This might me tricky to track down. Here are several options:
I have a linker error with _imp_glewInit or some other symbol that begins with _imp
This means that the library (in this case, glew) has been compiled as a static library, but you’re trying to use it as a dynamic library. Simply add the following preprocessor directive in your compiler’s options (for your own project, not glew’s) :
GLEW_STATIC
I have some other weird problem with GLFW
Maybe GLFW was built as a dynamic library, but you’re trying to use it as a static one ?
Try adding the following preprocessor directive :
GLFW_DLL
I have another linker problem ! Help me, I’m stuck !
Please send us a detailed report and a fully featured zipped project, and we’ll add instructions.
I’d like to solve this myself. What are the generic rules ?
Let’s say you’re the author of GLFW. You want to provide the function glfwInit().
When building it as a DLL, you have to tell the compiler that glfwInit() is not like any other function in the DLL : it should be seen from others, unlike glfwPrivateImplementationMethodNobodyShouldCareAbout(). This is done by declaring the function “external” (with GCC) or “__declspec(dllexport)” (with Visual).
When you want to use glfw, you need to tell the compiler that this function is not really available : it should link to it dynamically. This is done by declaring the function “external” (with GCC) or “__declspec(dllimport)” (with Visual).
So you use a handy #define : GLFWAPI, and you use it to declare the functions :
GLFWAPI int glfwInit( void );
- When you’re building as a DLL, you #define GLFW_BUILD_DLL. GLFWAPI then gets #define’d to __declspec(dllexport)
- When you’re using GLFW as a DLL, you #define GLFW_DLL. GLFWAPI then gets #define’d to __declspec(dllimport)
- When you’re building as a static lib, GLFWAPI is #define’d to nothing
- When you’re using GLFW as a static lib, GLFWAPI is #define’d to nothing.
So the rule is : these flags must be consistent. If you build a lib (any lib, not just GLFW) as a DLL, use the right preprocessor definition : GLFW_DLL, GLEW_STATIC
My program crashes !
There are many reasons why a C++ OpenGL application might crash. Here are a few. If you don’t know the exact line where your program crashes, learn how to use a debugger ( see shortcuts above). PLEASE don’t debug with printf().
I don’t even go inside main()
This is most probably because some dll could not be found. Try opening your application with Dependency Walker (Windows) or ldd (Linux; try also this)
My program crashes on glfwOpenWindow(), or any other function that creates an OpenGL context
Several possible reasons :
- Your GPU doesn’t support the requested OpenGL version. Try to see the supported version with GPU Caps Viewer or similar. Update driver if it seems too low. Integrated Intel cards on netbooks especially suck. Use a lower version of OpenGL (2.1 for instance), and use extensions if you lack features.
- Your OS doesn’t support the requested OpenGL version : Mac OS… same answer.
- You’re trying to use GLEW with an OpenGL Core context (i.e. without all the deprecated stuff). This is a GLEW bug. Use glewExperimental=true before glewInit(), or use a compatibility profile ( i.e. use GLFW_OPENGL_COMPAT_PROFILE instead of GLFW_OPENGL_CORE_PROFILE )
My program crashes on the first OpenGL call, or on the first buffer creation
Three possible reasons :
- You’re not calling glewInit() AFTER glfwOpenWindow()
- You’re using a core OpenGL profile, and you didn’t create a VAO. Add the following code after glewInit() :
	GLuint VertexArrayID;
	glGenVertexArrays(1, &VertexArrayID);
	glBindVertexArray(VertexArrayID);
- You’re using the default build of GLEW, which has a bug. You can’t use a Core OpenGL Profile due to this bug. Either Use glewExperimental=true before glewInit(), or ask GLFW for a Compatibility Profile instead :
glfwOpenWindowHint(GLFW_OPENGL_PROFILE, GLFW_OPENGL_COMPAT_PROFILE);
My program crashes when I try to load some file
Setup your working directory correctly. See Tutorial 1.
Create a test.txt file and try the following code :
if ( fopen("test.txt", "r" ) == NULL ){
    printf("I'm probably running my program from a wrong folder");
}
USE THE DEBUGGER !!!! Seriously ! Don’t debug with printf(); use a good IDE. http://www.dotnetperls.com/debugging is for C# but is valid for C++ too. Will vary for XCode and QtCreator, but concepts remain exactly the same.
Something else is wrong
Please contact us by mail